Saturday, November 5, 2016

Finish ribs, start on bow

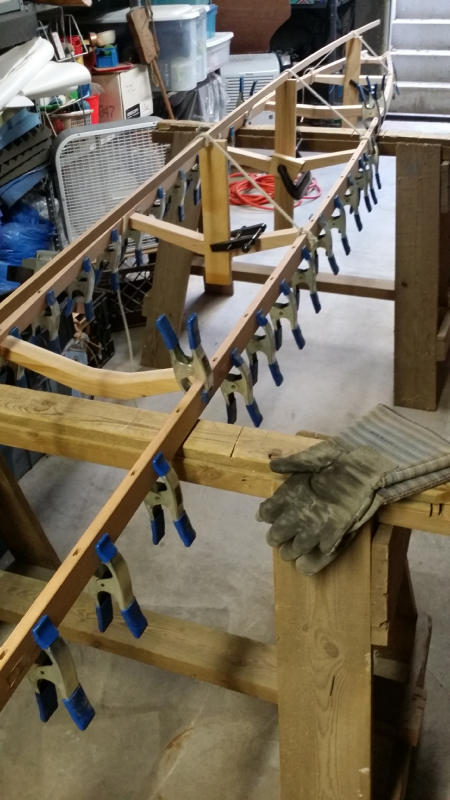
Once the bent ribs have cooled and dried it's time to get them all aligned.


Placing lengthwise hull stringers symmetrically on both sides of the keel provides a reference.  This lets me align the ribs perfectly with each other and with the lines of the boat.

Basically that means adjusting where the ends are clamped until both sides are symmetrical and each rib is in line with the ones in front and in back.  Of course, tweaking one often means you have to tweak the ones next to it and the ones next to them and...  It takes a while.

  
Once they are all in final position, a hot-glued gauge made from rib scraps makes it easy to mark where to cut each rib.


66 ends to cut.

 
The ribs line up nicely with the stringers.


Whew!  It is starting to look really boat-like.


What will I do with all those cut ends?  Obviously, a quick game of Jenga!  If I pull this one will they all fall down?


Before moving on, let's take one art-shot up the middle, just for fun.

Ok, Next up is working on the complex "bifid" bow.  There are two separate bow pieces, upper and lower.


The upper half of the split bow notches into the gunwales in front of the bow block.

  
The first half is hand-drawn to fair nicely into the gunwales and into the curve at the tip.  Then careful measuring makes the 2nd half exactly match the first half.

From this angle it looks like a platypus.


A slim strip left from cutting ribs makes a nice bendable guide for making clean curves.

 
Swap a 1/4" blade into the band saw so it can make tight curves and then cut out the top of the bow.. Using a spoke shave and chisel, clean up the saw marks and slant the edge to match the slant of the gunwales.

The rest of the pieces for the top are simple to cut.  Then chamfer the edges with the spoke-shave and chisel.


Finally, glue the whole top bow up with waterproof epoxy.  Some creativity is required to put pressure in all the required directions while the glue sets.  (The bow is upside down on the bench, in case that isn't obvious).

Now for the bottom half of the bow.  The bottom of the bifid bow swoops up in front of the top half - but to do that I need a wider piece of wood than I have.


So peg and glue an extension.  This piece will become the bottom of the bow and also the forward third of the keel.

However, now it's gotta sit until the glue sets.

If you're having a hard time seeing how all these pieces come together, you're not alone.  It will all become clear next time!


Wednesday, November 2, 2016

Ribs on the Barbie

That would be kayak ribs heating on the gas grill so I can bend them, of course.

I have read a lot of discussion about bending wood.  The critical factors are water content in the wood and the level of heat.  Steam or boiling water or even a hot iron will work. 

Steam is fast but it has the drawback that if you leave the wood in too long it gets too hot and the fibers start to let go of each other, so you have to determine the precise length of time for optimal floppiness without losing structural integrity.

A hot iron works nicely for localized bending, but it requires an iron and for some reason Win's not eager to have sap stuck to her clothing iron.

Boiling water seems to be ideal - you can leave the wood in for long periods without bad side effects.  If the wood is dry, soaking it for a day first is recommended but my oak is nice and green, so no pre-soak needed.


The boat is all prepped.  The keel-guide is tied in place and all my clamps are right where they will be needed.


I have this lovely copper tray that used to be the waterproof lining of a planter.  It fits nicely on our gas grill.  We are having a lovely warm day so there's no issue with having the bulkhead open.  Of course, I should be raking up all those leaves before it rains again...


The grill is positioned where I can grab a hot rib and trot down the stairs and bend it in place.


Waiting for the water to heat and for a batch of ribs to heat, I finish sanding the sharp edges off the last few ribs.


They're hot!  I grab each rib in turn and start bending it as I head down the stairs.  When hot, the ribs will take an amazingly sharp bend without any issues.


33 ribs later - it's really starting to have the shape of a boat!  I am going to leave the ribs clamped in place for a day or so to dry and set into their final shape.

Next comes a great deal of careful futzing to tweak the ribs into perfect alignment with each other before I cut them and drop them into their sockets.


As I turn out the lights the boat lurks in the gloom like some prehistoric creature with way too many legs.

Baidarka - going to 3d

After finishing all the deck beams, they need to be pegged in place.  Turns out that I have a can of pegs just the right size left over from making my last boat (see, saving everything that looks useful ISN'T hoarding!), so that went quickly. 


And finally, all the tenons needed to be trimmed flush where they come through the gunwales.  Sanding, even with a good sanding block, would wear down the gunwales as well as the ends of the tenons.  The best solution is to trim them with a very sharp chisel. 


I can hand-sharpen a chisel to reasonably sharp, but that isn't quite the razor sharpness I would like.  So I gave up and bought a honing guide.  Dad would have had a cow, but he had very steady hands and the ability to repeat movements exactly for long periods of time.  When I hand-sharpen I end up with curved "flat" surfaces.  However, a quality evening with the honing guide and varying levels of grit from 100 grit sandpaper through three grades of stone, ending with 1000 grit sandpaper gave me a wonderfully sharp pair of wide and narrow chisels and a 2" plane.


The sharp chisel takes off a paper thin layer, even across the grain, leaving a nice smooth flush end!


The top outside edge of the gunwale needs to be rounded off so the skin will curve over it instead of having a sharp edge that will wear through.  (see the pretty curls coming from the lovely sharp blade...)


Given the grain, I can only plane in one direction so I do a long pass the full length of the boat getting a thin curly shaving, then trot back down the boat and do it again (and again and ... then switch to the other side!).  Glad I'm not building a longer boat!


Finally, the bow and stern blocks need to be lashed to the gunwales.  I grooved the wood so that when the skin is on, the lashings won't form a ridge that would wear through.


The deck is now one solid piece.  I can pick it up and wave it around and it holds its shape and nothing falls off!


And after all this, it looks just about the same as it has for weeks.


Before I bend the ribs, I need to be absolutely sure that I make them deep enough that I can get into the boat!!  So I set the deck up on blocks on the floor for testing.


The cross-piece is the thickness of the future cockpit coaming, so if I can sit on that and slide under the deck beam in front of it, that is the right depth.  The size I calculated back before starting is just exactly enough space, with no wiggle room.  I decided to add 3/4 of an inch for cold weather clothes and general ease of entry. 


I also make a note that the ribs at that point need to have a generous curve so I can fit my, um, generous curve in the bottom of the boat.

There are two ways to bend ribs.  Making patterns for each one and bending each rib over its pattern, or setting up a batten where the keel will be and bending the ribs in place just touching the batten.  No way I'm making 33 separate patterns.  I hand-bent the ribs for the last boat and it worked fine.  I'm doing that again. 


With the batten bent it's starting to look like a three dimensional boat instead of just a deck!


So, about those ribs.  When we last saw them, the planer produced thin, wide strips that were the right thickness but needed to be cut into several ribs each.  To bend a rib evenly, it helps tremendously if the rib is the same thickness and width from end to end.  The planer made sure of the thickness.  However, the edge was still a bit wavy from where I'd hand flattened the original log.  I was going to have to make that edge perfectly straight.


It just so happened that a co-worker came by my desk last week and said he had to get rid of a jointer 'cause he'd developed an allergy to wood dust (side effect of liver & kidney transplant).  Did I have any use for it?  What perfect timing!        


He brought it over mid-day on Sunday (in a power outage, thanks to the wind and the power lines going through the trees).  When the power came back in the afternoon I put clean straight edges on all the strips.


Then I ran the strips through the table saw and got perfectly even ribs.

(note that both photos are mocked up with the tools turned off.  I value my various body parts too much to try to hold a piece of wood on a spinning blade while taking a selfie, thank you very much).

Some quality time with the power sander rounds the sharp corners so the ribs won't wear on the skin (of the boat or the person sliding into the boat).


Next trick is bending ribs.  From reading various sources, hot water works as well as steam and doesn't have the timing issues (steam too short a time and the wood doesn't bend, too long and it splinters).  I happen to have an old copper pan from a window planter that holds water and is long enough to hold the ribs and will fit on the grill...  Should work!  I'll let you know.

Baidarka progress

I finally finished running oak through the band saw (wore one blade down to rounded nubs).


I started with a 6" section of log (largest I can get through the saw), then cut that into 2" boards, then cut those into 5/16 slats.


Then I took the best 33 potential ribs and ran them through the planer.


I am nearly done, just have to cut them to width on the table saw.

Meanwhile, attaching the bow and stern blocks required pegs.


I happened to have several strips of oak that hadn't qualified as ribs, so I squared some of it up and made pegs.  (In woodworking a square peg in a round hole is a *good* thing!)


The exciting part is drilling the peg holes - making sure all the parts stay perfectly lined up and making sure the drill stays in the wood for the full two inches!!!.


With the blocks in place, it's time to split them and then lash them together.  The goal is to allow the frame to flex so the boat gives with the waves instead of smashing through them.

The "artificial sinew" is waxed nylon.  It is very strong and holds well.  I am using a bent piece of wire instead of a sailor's needle and finding it works very nicely.


Now for the deck beams.  Each one is unique.  The foredeck slopes down to the bow, the gunwale is both slanted sideways and curved differently at each beam, and finally some silly person decided to mortise the beams instead of pegging them so each tenon has to be cut to perfectly fit the slot in the gunwale.


It takes me about an hour of careful measuring, cutting, and fitting for each one.  First roughing it out on the band saw, then finishing off with hand saw, chisels, plane, file, and sandpaper.


I have them all in place.  Still have to do some final fitting so the tenons are all flush in the mortises.

Then I get to bend the ribs!  And then bow and stern, and keel and deck stringers, and then skin.

Will be really interesting to see whether I get the boat finished before the water freezes.

Building a Baidarka (West coast skin-on-frame kayak)

I'm building an 18' long, 20 inch wide baidark, which is a west coast skin-on-frame kayak.

This is my second boat, but the first time I've done it solo. In 2009 I built a Greenland kayak in an excellent workshop run by Turner Wilson. I am using Wolfgang Brink's "The Aleutian Kayak" for guidelines (though I've modified the dimensions and some other details). Brink assumes you have done this before and understand details like lashing and how to cut mortises. I am using notes from the first boat plus Christopher Cunningham's "Building the Greenland Kayak" for construction details. There are still places where I have to sit and think for a while.

 A kayak is built "upside down" from other kinds of boats. Instead of laying the keel and putting in ribs and planking it up, you start a kayak from the gunwales, then place deck beams to shape the deck and then ribs to define the shape of the hull. Finally, you lay strips over the ribs to define the keel and hold the skin off the ribs.

 I am using Douglas fir for the gunwales (because I could get an 18' clean board), cedar for the deck beams (light and strong) and a section from a neighbor's oak tree for the ribs (strong and green so it will bend). 

So the first step is to rip one long piece in two so the gunwales are perfectly symmetrical. An 18' board is tough to rip in a 32 foot basement - lacking 4 feet. However, with the door to the bulkhead open and starting the board on the stairs, there is just room.

 
View from the stairs in the bulkhead. You can just see the table saw in the middle and several sheets of plywood on the far side.


 The next step is to cut spacers to define the hull shape and check that both gunwales are symmetrical (yes!).

Before it all goes together, the gunwales need mortises for the ribs and mortises for the deck beams. I'm building an 18' boat but I have instructions for a 16' one. Before I could start mortising, I had to do some figuring.

In particular, I wanted to be sure I could actually get into this boat. So I did a rough mockup of the cockpit by stacking 2x4's on the floor and putting cross pieces for where the back of the cockpit coaming and the bottom of the first deck beam were going to go and tried to slide into it. Yup, as I suspected, I didn't fit. Some futzing about and I found that if I add an inch in depth and make the cockpit 24" long then I can slide in. I'd hoped that I could use the same spray-skirt as on the Greenland skin-on-frame, but no. The Greenland cockpit coaming slants up as it goes forward, which makes it easier to get into and allows it to be shorter than the baidarka cockpit, which is level.

Given all that, now I could place the 8 deck beams and from there figure where the 33 ribs were going. Lots of careful measuring and marking and I was ready to drill mortises.

Jigs and a router help a lot with getting each mortise in exactly the right place, shape, and size.


 In the end there's still some hand work. The first deck beams to go in are the bow and stern blocks These are marked and cut to fit all the angles, and then carved out to lighten them.


 Ooh, pretty curls!


 Finished off with a round file and sandpaper.


 It fits! Next is to fix it in place with pegs. In the mean time, working on ribs. Green (bendable) oak (strong!) makes excellent ribs. My neighbor put in a new driveway and donated a section of an oak tree that was in the way.


 I used a chain saw to rough-cut a nice section. Cutting it into boards requires a flat side. Some quality time with a plane and a straight flat reference board provides that.

 
 Then put it through the band saw to cut a slice. That oak is hard - lean on it enough to cut but not enough to stall the saw and spend a long time watch it inch slowly forward.


 Then cut the slice into strips the thickness of ribs. I need 33 ribs, plus a few extra in case some break during bending. So far I've put in many hours and cut blanks for 28...