Saturday, November 26, 2016

Float Test!

I want to check the position of the cockpit by doing an actual float test.  But the hull needs to be complete to do that.

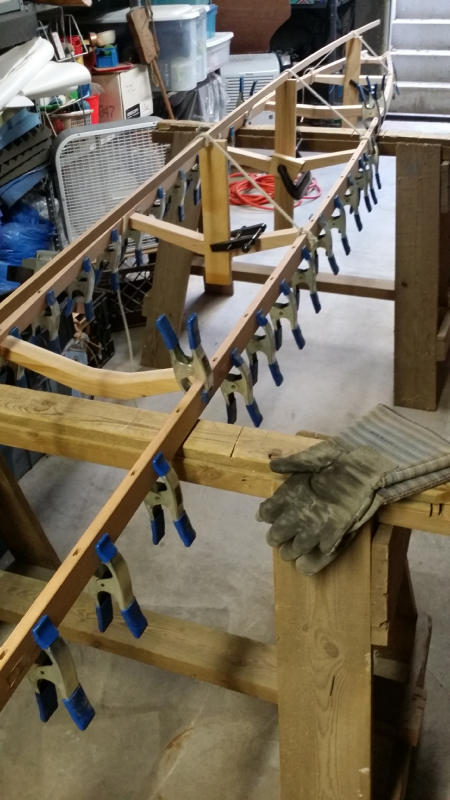
I'm almost done with the parts for the hull.  The last bit of shaping is rounding off the outside of each of the eight hull stringers.


They will go along the ribs and provide the surface that the skin will rest on.


Some quality time with the spoke shave and sand paper (8 stringers * 18 feet each = 144 feet) and I have nicely rounded stringers that won't wear through the skin where it is stretched over them.

As I've said, the secret of the baidarka's performance in waves is the flexibility of the hull.  That depends on all the connections being able to flex.  So the boat is held together by lashings made of artificial sinew (aka waxed nylon).

The keel is in three sections with curved joints that can flex.  The joints are held together by two lashings at right angles, one around joint and one along the joint.


The keel is subtly notched for the around-the-keel lashing so that it doesn't make a bump that will wear on the skin.


The vertical lashing goes on first, but that squishes the joint apart.  So I use two clamps and a very tight string to keep the joint together until the horizontal lashing is in place.

The upper and lower bow need to be connected.  Triangular lashings tie both together and can be tightened down nicely by finishing up around both legs of the triangle.


The finished knots crunch the lashings down nice and tight.


The lower bow is the forward end of the keel  Now that it is tied to the upper bow, it's time to tie the rest of the keel to the ribs.  I mark the keel at each rib and drill a hole at the mark.

The kids and their spouses arrive.  Thanksgiving is here.  We have a wonderful family party.  Then, the day after, I get back to work.  If I hurry I might get the float-test in before the kids leave.

I'm running into a time crunch so I draft kids to help!  My daughter-in-law, Jamie, does the meticulous measuring to make sure that the keel is exactly centered between the gunwales.


I cut a piece of sinew 1 1/2 times the length of the boat and secure it to the first rib.  Then my daughter, Patsy, and I tie a running stitch around each rib and through each hole in the keel.  It is so much easier with two people to feed that much line around and through without getting (too) tangled on clamps, feet, saw horses, and other projections.


In one long evening, I get the stringers on and lash boards to sit on.  For a wrap test, I only need to secure the stringers at strategic ribs.  Eventually I'll need to tie every rib/stringer intersection.


The tail section connects to the keel and deck using the same v-shaped lashings.


Patsy and I put several lengths of 20 inch stretch-wrap long-wise and then spiral-wrap from one end to the other.  To finish it off I do another set length-wise.  When we wrapped the deck we left a space where the cockpit will be so that I can get in!

It's too late for a test before Jamie and Bob have to leave, but Patsy and Christopher will be here through the weekend!


Saturday was a perfect dead-calm for testing at Hopkinton Reservoir.  I love the way the sun shines through the transparent covering.  Win took these wonderful photos.


It floats!

If I slide far forward then the balance is about right.  I was right, I need to move the cockpit about a foot and a half..


The stretch-wrap doesn't seem to be leaking.  Let's go for a little spin, just to see how it handles!


The boat moves right along.  I think I will like paddling it.  But I'm beginning to hear a lot of noise around the stern - the outer layer of plastic is starting to come unwrapped.  Time to wrap up this test!


Hmm, if I move the cockpit then it will balance better when being carried too.

Given the futzing required to move the deck beams in order to move the cockpit I may not get the boat finished before the ice sets in, but at least I have had a chance to try it in the water and know that it will paddle well when it's finished.

Will It Float???

Well, I'm sure it will float, but I am a bit concerned with where the seating position is relative to the center of the boat.  It seems a bit far back.  I'm afraid I'll be paddling along with the stern dragging and the bow sticking up in the air.

I found FreeShip, online, that would calculate the center of buoyancy and total displacement if I had an accurate set of hull cross-sections.


To get accurate hull sections I drew a grid 10 inches by 20 inches on a sheet of plywood.  Then I pulled the ribs at the bow and stern and each of the deck beams and photographed them on the grid. I also measured exactly where those ribs were along the length of the boat.


Then I recorded where the ribs intersected the grid and entered points in a spread sheet (data for four ribs shown above) with conversion to the format that FreeShip imports and with graphs to visual-check the data.  


FreeShip validated that the displacement would be sufficient to float me (whew!) but the center of buoyancy definitely looked a bit far forward of the designed seat position.

Ok, now I am concerned.  There is one way to be sure - do a "Saran Wrap" float test once there is enough of the hull put together.

Thanksgiving was coming up and the kids will be home with their spouses.  It would be a fun family project to wrap the boat in industrial stretch-wrap and see if it will hold water long enough for Dad to test it.

I just had to get the boat far enough along that it could get wrapped!


Monday, November 14, 2016

Bow, Keel, and Stern

The lower bow is part of the keel.  The keel is in three pieces with joints between so that the boat can flex.  The stern is an unusual shape that resembles a fixed rudder.

There is a good deal of variation in traditional baikarka lower-bow shapes.  Some are thick, resembling a tanker's bulbous bow, and some are slim like a knife blade.  I am making the slim version.

The bow gets wrapped in skin and would trap water and rot unless channels were cut to allow water to drain out.  So the first step is to carve the edges of the bow to allow drainage:


The chamfer around the edge is hollowed out to provide a passage for water to drain.

Ordinarily, the chamfer would run the length of the keel, but I plan to put an outside keel strip on for wear protection, so I've just smoothed the bottom edge of the keel so the skin won't wear and have otherwise left it flat.

Since I store the boat indoors upside-down, I don't expect issues with water collecting along the keel.


The keel gets two curved joints that will allow it to flex with the waves (spread open so it shows for the camera).  The joints let the wave's energy pass through the boat instead of slowing it down.


The tail piece is wider than any boards I have, so I glued up three together.


Cutting the center out of the tail reduces its weight.  It gets chamfered around the hole and along the top edge.  The bottom edge is straight and flat where it will connect to the keel.


Test fitting the tail piece to the keel.  I won't trim it to final size until I flip the boat and put on the deck stringer, which the tail piece also connects to.

Next up is shaping and sizing the hull stringers (4 on each side, nicely rounded and fitted for length). Then lots of lashing!

Saturday, November 5, 2016

Finish ribs, start on bow

Once the bent ribs have cooled and dried it's time to get them all aligned.


Placing lengthwise hull stringers symmetrically on both sides of the keel provides a reference.  This lets me align the ribs perfectly with each other and with the lines of the boat.

Basically that means adjusting where the ends are clamped until both sides are symmetrical and each rib is in line with the ones in front and in back.  Of course, tweaking one often means you have to tweak the ones next to it and the ones next to them and...  It takes a while.

  
Once they are all in final position, a hot-glued gauge made from rib scraps makes it easy to mark where to cut each rib.


66 ends to cut.

 
The ribs line up nicely with the stringers.


Whew!  It is starting to look really boat-like.


What will I do with all those cut ends?  Obviously, a quick game of Jenga!  If I pull this one will they all fall down?


Before moving on, let's take one art-shot up the middle, just for fun.

Ok, Next up is working on the complex "bifid" bow.  There are two separate bow pieces, upper and lower.


The upper half of the split bow notches into the gunwales in front of the bow block.

  
The first half is hand-drawn to fair nicely into the gunwales and into the curve at the tip.  Then careful measuring makes the 2nd half exactly match the first half.

From this angle it looks like a platypus.


A slim strip left from cutting ribs makes a nice bendable guide for making clean curves.

 
Swap a 1/4" blade into the band saw so it can make tight curves and then cut out the top of the bow.. Using a spoke shave and chisel, clean up the saw marks and slant the edge to match the slant of the gunwales.

The rest of the pieces for the top are simple to cut.  Then chamfer the edges with the spoke-shave and chisel.


Finally, glue the whole top bow up with waterproof epoxy.  Some creativity is required to put pressure in all the required directions while the glue sets.  (The bow is upside down on the bench, in case that isn't obvious).

Now for the bottom half of the bow.  The bottom of the bifid bow swoops up in front of the top half - but to do that I need a wider piece of wood than I have.


So peg and glue an extension.  This piece will become the bottom of the bow and also the forward third of the keel.

However, now it's gotta sit until the glue sets.

If you're having a hard time seeing how all these pieces come together, you're not alone.  It will all become clear next time!


Wednesday, November 2, 2016

Ribs on the Barbie

That would be kayak ribs heating on the gas grill so I can bend them, of course.

I have read a lot of discussion about bending wood.  The critical factors are water content in the wood and the level of heat.  Steam or boiling water or even a hot iron will work. 

Steam is fast but it has the drawback that if you leave the wood in too long it gets too hot and the fibers start to let go of each other, so you have to determine the precise length of time for optimal floppiness without losing structural integrity.

A hot iron works nicely for localized bending, but it requires an iron and for some reason Win's not eager to have sap stuck to her clothing iron.

Boiling water seems to be ideal - you can leave the wood in for long periods without bad side effects.  If the wood is dry, soaking it for a day first is recommended but my oak is nice and green, so no pre-soak needed.


The boat is all prepped.  The keel-guide is tied in place and all my clamps are right where they will be needed.


I have this lovely copper tray that used to be the waterproof lining of a planter.  It fits nicely on our gas grill.  We are having a lovely warm day so there's no issue with having the bulkhead open.  Of course, I should be raking up all those leaves before it rains again...


The grill is positioned where I can grab a hot rib and trot down the stairs and bend it in place.


Waiting for the water to heat and for a batch of ribs to heat, I finish sanding the sharp edges off the last few ribs.


They're hot!  I grab each rib in turn and start bending it as I head down the stairs.  When hot, the ribs will take an amazingly sharp bend without any issues.


33 ribs later - it's really starting to have the shape of a boat!  I am going to leave the ribs clamped in place for a day or so to dry and set into their final shape.

Next comes a great deal of careful futzing to tweak the ribs into perfect alignment with each other before I cut them and drop them into their sockets.


As I turn out the lights the boat lurks in the gloom like some prehistoric creature with way too many legs.