The skin should be durable and hold up in the sun. Eventually I found that www.MarineVinylFabric.com has heavy-duty 40 gauge marine vinyl intended for the windows of soft-tops for boats. It is UV resistant and extremely clear. Perfect. Now, how much do I need?

The skin will be in three pieces, a deck and two sides of the hull. The deck and sides will overlap on the gunwales. The bottom of the sides will overlap on the keel. Some quality time with a tape measure gets me accurate dimensions for the pieces. I order a roll and it comes promptly.
I try to lay the pieces out directly on the vinyl but that turns out to be very difficult and I'm worried about any errors forcing me to scrap the entire skin and start over.

So I get an inexpensive tarp, lay out the pieces on it, and cut templates from that. I cut them a little oversize so I can tweak them if necessary.


And I am very glad that I did as both the bow and stern needed a bit of tweaking to drape nicely.


The basement is just long enough to unroll the vinyl on the unused half of the tarp. I outline the templates with wet-erase white-board marker and start cutting. That's a lot of heavy duty vinyl to cut.


Whoops, almost forgot that I want lines inside the boat on the bow and stern to pull float-bags into the respective ends once the skin is on. Gotta do that now. (Float bags provide emergency flotation if the boat gets filled with water.) I drill a hole in both the bow and stern plates, lining it with copper so the string won't dig into the wood. Then I put a string through that's long enough to reach back to the cockpit. At the cockpit end I go around a rib and tie the ends together and add a loop. Now I've got a continuous line that I can use to pull a float bag into the bow or (pulling the other side) pull it back out.


The weather has turned hot, which is perfect. I stretch the first side-piece and staple it to the keel with stainless steel staples. The second piece is HH-66 cemented to the first piece. HH-66 is a very effective contact cement used for bonding river raft seams.

I tip the boat on its side to glue the deck onto the sides. To hold it up I daisy chain spring clamps so they are heavy enough to counter the weight of the hanging vinyl. Glad I have lots of spring clamps.

What a nice smooth deck. Just needs a hole so I can get in!


Some careful tracing around the inside of the cockpit coaming and then an additional 1 3/4 inches for overlap. Finally, cross my fingers and cut out the hole with a sharp knife.


A heat gun softens the vinyl enough that I can stretch it up to the inside of the cockpit coaming.

When the vinyl cools, it holds its shape pretty well. I am going to sew the skin onto the coaming. Now I need to drill all the holes in the coaming to sew through.

A quick test with a scrap of wood and a scrap of vinyl shows that a 3/4 inch stitch length works well. I pull as hard as I can and the vinyl doesn't tear. Masking tape on the side of the coaming lets me put clearly visible dots and will help keep the surface from splitting as I drill. Then a long session of drilling. (Estimated roughly 100 holes. You're welcome to count them).

Vinyl is most likely to tear where there is a sharp corner. Rather than poke a hole with a needle, I clamped the cockpit back onto the vinyl and drilled through the vinyl at each hole. Then I sewed twice around with the artificial sinew (waxed nylon). Finally, I folded the extra vinyl down over the stitch line and glued it. This should both reinforce the sewn section and waterproof the holes where the stitches go through.
Note the support for the cockpit coaming is inside the skin and gets lashed to the coaming at the same time the skin is sewn on.
The final pass is gluing a 2 inch wide strip over the keel seam, both to ensure it is water tight and provide a layer of protection from rocks and such.

The skin is done!
This is my first pass at working with vinyl but from this far back it does look rather nice. It's never going to look this clean again!


Time to add the practical stuff to the deck. Stainless D rings held with vinyl flaps will anchor bungee cords. I'm worried that the vinyl piece will stretch so I incorporate a short piece of nylon string, unlayed at the ends so it will spread the load.
The foredeck gets three rings on each side. The end rings are angled in (the butterfly shapes) and the center ones are straight (the bow-tie shapes).


The glue develops its full strength in 24 hours. The next day I put on the bungees.


The final step is adding paddle loops at bow and stern. These allow me to secure a paddle on the deck with one end through the lope and the other under the bungee cords by the cockpit. The vinyl is soft, especially when it gets warm, so I needed something to stiffen the loop, keeping it standing up so I could slide a paddle under it. Win came to the rescue with two lengths of plastic stay material meant to stiffen clothing. Works well on vinyl too!

This is how the bungees and paddle loop look in use.

I found that Sealine (maker of Seals spray skirts) will make custom spray skirts. Their instructions are simple: trace the cockpit and indicate where the tunnel should be. Then order through a local retailer (REI in my case). I've sent the order off. It'll be a month or so before I get the spray skirt. Luckily this is a very dry boat (high sided and sloped decks that shed water). So for now I'll paddle it as a high performance recreational kayak.

I'll wait till I have the spray skirt to find out how it rolls and to take it out in big breaking waves.
I've taken the baidarka out three times so far, in local flat water and on the ocean. It feels the exact opposite of my Greenland boat (below).

My old boat - a Greenland kayak
The baidarka cockpit feels like sitting in a bathtub, especially compared to the low volume Greenland cockpit I am used to. The baidarka's deck is about 2 inches wider too. The height of the deck and the deck's slope combine to shed water so waves that would soak me in the Greenland boat just slide off and I stay totally dry.
I've had no problem paddling without a spray skirt even in moderate waves. The high deck may make it a real challenge to roll though.
I am higher off the water than in my Greenland boat and need a longer paddle. Aleutian paddles are typically longer than Greenland ones, now I see why.

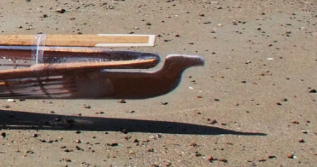
I had one big problem - I could not figure out how to get in and out without a flat back-deck to put the paddle across for stability! If I put the paddle across the cockpit the blade doesn't leave me enough room to get in. If I don't put the paddle across the cockpit then I fall over! Finally I created a little horizontal "landing pad" behind the cockpit that's tied to the bungee D-rings. (you can see it behind the cockpit in the beach picture, above). It's not pretty, but it works.
The long slim hull is fast. I'm sure the smoothness of the vinyl helps there too. For the same effort, this boat is going about half a mile an hour faster than my Greenland boat. Since the baidarka's waterline length is 19 feet and the Greenland boat's waterline length is 17 feet, that's just about right. The theoretical hull speed in miles per hour is 1.5 * square root of the waterline length. For my Greenland boat that is 6.1 mph. For the baidarka that is 6.5 mph.
The baidarka's V-shaped hull is very tippy initially but then seems to be rock solid stable once it is leaned over. My Greenland boat is fairly stable on its flat bottom, but if you start to lean, it has no secondary stability at all. It just goes right over (and comes back up the other side).
I'm still working on developing my balance in this boat. The first long trip was a learning experience. Initially I had an inch-thick foam seat pad. Taking that out dropped my weight down and helped tremendously with stability. I worried how the stability would be in waves but was pleasantly surprised to find that it feels about the same as my Greenland boat (except dry, completely dry!!)
In strong wind the boat has a rather strong weather helm. Perhaps I moved the cockpit too far forward. If I re-skin the boat (not for a long time, I hope!) I'll move it back six inches and see how that feels.

I'm looking forward to many trips in this boat.


